Wednesday, September 20, 2006

[Tip] Pragma Mark ( Organizing your source code )

Well I've just been frustrated today by several things going on including getting a wireless ethernet adapter to work so to get my mind off everything I thought i'd just post an easy quick tip before going to bed. One thing many new people aren't aware of in Xcode is the Pragma mark in source code. Pragma mark is simply a way to organize your methods in the method list pop up button in Xcode (as were using it here, though there are more uses of pragma mark on other platforms/IDE's.) On a default project you might see something like this Now on a very small project with only a few methods that's not really hard to go through. The problem is as soon as you have a ton of methods in any one file it's difficult to do down through the list and find the one method your looking for, and even if you don't have a ton of methods you should use pragma mark to help you organize your code for yourself and (if your working with anybody else) your team. With pragma marks you can do 2 types of labels

#pragma mark -
which will simply put a horizontal line spacer in your code. (Warning! - When using this you cannot have a space after the "-" otherwise Xcode assumes you are making a text label (below in next example) and won't insert a horizontal spacer line.) And there is
#pragma mark label name
which will add a label in bold to your method pop up list. When using this one be very simple and to the point so it's obvious of where the method your looking for is at. So if we add some of those pragma marks to the source code like
#pragma mark Initialization Methods #pragma mark -
to the source code when we want to add a label you can make the list now look like this 
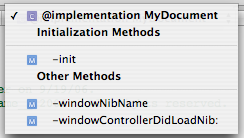
Now again this example is small and that second label doesn't make sense where it is (just wanted to put a 2nd one in there), but when you start getting into bigger and bigger projects it's practically mandatory to add pragma mark labels and spacers to your source code. Do yourself a favor and from the start of working on a cocoa project use pragma marks to help you organize your code. Remember that Xcode reads methods on any given file you are viewing/editing from top to bottom and will put the methods and labels on that popup list as it encounters them. It may not matter where you put your methods in your file for compiling them, but it will matter where your methods are if you intend to use the pragma mark labels.

Tuesday, September 19, 2006

[Link] Using delayed messages in Cocoa/Objective-C

Just thought I'd quickly post this while coding tonight. If you haven't seen Scott Stevensons Blog Theocacao you should as he posts a lot of great tips. Recently he posted about using delayed messages in Cocoa, specifically within the context of awakeFromNib methods (though this can be used anywhere) which is called right after all the contents of the nib are loaded off of disk or at least that's how it's supposed to work. Sometimes awakeFromNib is called when the contents of nibs aren't truly 100% loaded so therefore the need to delay a method execution can be helpful. In my experience this is rare (at least on my PowerBook G4) though it can happen. At the very least it could help you in the future. Take a look at his post. Using Delayed Messages in Cocoa

[Correction] Prototyping Interfaces Tutorial

In my first tutorial I realized I made one significant mistake and left something out For the NSTextView in order to bind it to "value" you must uncheck "Multiple Fonts allowed" otherwise it assumes you are working with a NSAttributedString (string with attributes like bold, italic,etc) vs a plain NSString. Sorry for any confusion this may have caused.

Monday, September 18, 2006

[Question] Is NSEnumerator really faster than using a for loop?

Now this is a classic question. One of the strange things you see just learning Cocoa/Objective-C is this thing called the Enumerator loop which looks something like

NSArray *anArray = // ... ; NSEnumerator *enumerator = [anArray objectEnumerator]; id object; while ((object = [enumerator nextObject])) { // do something with object... }
and naturally people ask if using NSEnumerator is really faster than using a for loop like this example
NSMutableArray *my array = //... int i; for( i=0; i < LIMIT ; i++) { NSManagedObject *obj = [myArray objectAtIndex:i]; //do something with object }
The answer to this question is yes just a little bit though. I've been told by some smart people (though I haven't verified) that the kernel XNU on Mac OS X is optimized for Objective-C messages, even if you don't believe that we all know Apple optimizes so much of their own software to take advantage of Altivec(PPC), hardware accelleration, etc. So naturally you should assume Apple has given you some reason to use this loop. To test what is really faster I went to CocoaDev and grabbed code off a page where a discussion on this very topic took place (take a good look at the source code.) I compiled this code myself and then ran it once, cleared out the test and ran the test 3 times, all tests using 10,000 objects and 10,000 iterations then punched in the results in NeoOffice. Here are the results (all times are in seconds): (pay attention to the NSEnumerator and for loop tests (first 2 on the left in the graph) for now) as you can see yes the NSEmumerator loop is faster than the for loop but only by a few seconds and that was with 10,000 objects and 10,000 iterations. When I did the same test with 1,000 objects and 1,000 iterations the results all land roughly within 1/10th of 1 second +/- a few milesconds. The conclusion Really just to stay in Cocoa standards you should use NSEnumerator, but at the same time it's not the end of the world if you don't. There are some examples where you might really need to know what the index of the object your dealing with is, in which case you should use a for loop. Now as for those last 3 tests on there aren't that important, I included them because they do show you can gain some speed by really optimizing the heck out of your code if you really want to do so. I encourage you to go to the CocoaDev page linked above and look at the code for yourself to see what you really want to use for yourself, but as you'll see the code is vastly more complicated than you'll want unless you really need to squeeze every last ounce of peformance out of your application.

Saturday, September 16, 2006

Introduction and [Tutorial] Prototyping Interfaces with Interface Builder

Introduction Welcome everybody! I find most tutorials out there are really good, but sometimes they leave out some better ways to do one part of the tutorial or I just find nobody really explains how to do various little things. That's why I started this blog, I wanted to post various tips, tricks and tutorials on how to do various tasks that all Cocoa Programmers go through and at the same time get discussions going on everything in Cocoa to help everybody out. I believe that by doing this I help you and myself at the same time. In everything I do I also believe in the term Wil Shipley first used* "Code Samurai." By that I mean that you try and hold yourself to high coding standards and always are striving to master Cocoa. [Tutorial] Prototyping Interfaces with Interface Builder For my first tutorial im going to start out simple with an app I initially gave to one of my friends to do, but he was lazy didn't have time. But I wanted bad enough (even though I wouldn't use it that often) that I did it myself in a few minutes. I called it LicenseKeeper and all it does is store licenses to various applications you have and allow you to sort through them and perform live searches, and add your own notes all with 0 lines of code**. And now i'll show you how to make this app. First off launch Xcode and create a "Core Data Application." File -> New Project Call the application LicenseKeeper and save it where you want. The Data Model In Core Data you don't create Instance Subclasses to create objects, you create Entities and use the data model to define the structure of the entity. So now double click the LicenseKeeper_DataModel.xcdatamodel file on the source list to the left so it opens the data model in it's own window. Now we'll just create one Entity "License." Click on the + icon in the Entities table and name the Entity "License." Then on the properties pane just to the right click on the "+" button and click on Add Attribute, then do this 2 more times. Name the attributes "name", "serialNumber" and "notes." Define all 3 of these to be Strings from the popup button in the detail pane or in the table itself. Next open the MainMenu.nib file by double clicking it in the source list and drag the window (height wise) to be bigger by a few inches. Now (heres the tricky part) just click the data model window and move it over so you can see the window in Interface builder and the entity in the data model. Got it? Good. Now hold down the alt/option key and drag the entity from the data model window to the interface builder window you just resized. As soon as you let go Interface Builder will ask you if you want to prototype the interface for one object or many objects. Select Many Objects. Assuming you did everything correctly you should end up with an interface looking like this Now this interface is really good even for a basic application, it obviously has some quirks. For starters Interface Builder lists your attributes in alphabetical order and so the license key and the notes should be switched around in the table and the detail part of the view. So first off you'll have to double click inside the table view to really click the header and move it around, so move the serial and notes headers around. Additionally swap them around (vertically) in the detail section below the table and delete the textfield for the notes and instead drag a NSTextView to it instead and resize it vertically to be bigger. Double click inside the text view and on the inspector pane (make sure the inspector says NSTextView instead of NSScrollView) bind the "value" to the License Array Controller with the controller key "selection" and the Model Key Path "notes." Lastly change the Window title to "License Keeper" then Save and quit Interface Builder. Go to Xcode and hit the Apple + R key to build and run the application and it should run like in the screenshot below What did we just do? We accomplished several things today 1. We built a Core Data Application 2. We created and defined an entity 3. We dragged the entity over and prototyped an inteface within Interface Builder 3. We rearanged the interface and binded an NSTextView object to an attribute in our entity This is a very simple application, but also a very capable one that benifets from Core Data so it has undo, redo, live search and persistence. By default Core Data applications store their data (in non Document based application template) in XML format. Core Data allows you to save your data in XML, SQL (sqlite) or Binary formats and you can change it, but i'll leave that for another day. Questions? Comments? Think certain parts of this tutorial could be written better? Want me to expand on a certain topic? Leave a comment here * at least amongst mac developers as far as I am aware ** aside from the predefined code Xcode auto-generates

Friday, September 15, 2006

Cocoa Samurai Opens Soon...

Soon I'll open this blog and begin bringing you some great Cocoa/Xcode/Developer Tool tips!

 
...